Tuesday, December 6, 2011

Gumbo


Gumbo is perhaps the most celebrated (and delicious) dish of Cajun/Creole cuisine. Combining elements of French, African, Spanish, German, and Native American cooking, nothing else captures the essence of South Louisiana like this famous dish.


The thing to remember about gumbo is that it is, at heart, a rustic, economical dish. Like other dishes created by early lower class Cajun settlers, the cooks of early South Louisiana managed to make a delicious meal out of the cheapest of ingredients.

In that spirit, a contemporary favorite of South Louisiana is to make a turkey/sausage gumbo out of Thanksgiving leftovers. For this dish, I did just that. 

First, we make the stock. I began with two turkey carcasses (one was fried, the other roasted), a carrot (adds a nice touch of sweetness), some leeks and celery that were getting old in my fridge, a head and a half of garlic, an onion, and a shallot. Note that this is not "standard" for your stock; you can play around with it. The point is that I just used what I had; it's better than throwing the stuff away.


Throw the carcasses in the pot, roughly chop everything else, and throw it on top of the carcasses. Throw in a few bay leaves, salt, and pepper.


Next, you want to cover with cold water. Don't use hot; all the impurities in the stock will dissolve in the hot water. By using cool water and slowly bringing the stock to a simmer, all the impurities will rise to the top, making it easy for you to scoop them off.


Simmer for a few hours. You want to get as much of that great flavor from those carcasses as you can. All the other flavors will slowly blend in, creating a nice rich stock.


Strain the stock, toss all the solids away and put the stock back in a pot (you can leave it aside for now).


Next, we're going to use the Cajun Trinity. If you have read my jambalaya post, you know what the Cajun Trinity is: onions, bell peppers, and celery. In addition to the Trinity, I added a couple of jalapenos and garlic cloves.


Dice those up and put them all in one container. Set aside for now, but keep it within reach.


Next, we move on to the most important part of the gumbo: the roux. Making a good roux is not particularly difficult, but you need to make sure not to mess up either. If you burn your roux, you cannot use it. It will ruin your gumbo. Do not think that you can cover it up or get away with it; you will ruin your gumbo if you use a burnt roux.


The good thing is that it is easy not to burn your roux if you are patient. If you are they type of person to whom patience does not come naturally, there is an easy solution:


Now the first thing we do is heat up some oil in a pot. The best oil for this is peanut oil, as it has a high smoke point (the temperature at which the oil will begin to break down and not taste good). Oils with a low smoke point (such as butter or olive oil) will ruin much faster, so I do not recommend those. Canola oil and vegetable oil are also fine for making a roux.

So anyone, I heated up about 1.5 cups of peanut oil in my pot


Next, you add equal parts flour to the hot oil. 


As soon as you add the flour, your roux is going to be pasty, white, and thick. What we're going to do is cook the roux over medium high heat over the course of about 20-30 minutes and watch as the roux slowly transforms into a chalky mixture into something that has tons of flavor and will set the tone for your entire gumbo. As they say, "it's all in the roux."

I prefer to use a cast iron pot with a slotted wooden spatula, but you can use pretty much anything you want. Some people use a whisk, some a long wooden spoon. Whatever gets the job done. They key, though, is NEVER STOP STIRRING. If you stop stirring, you will burn your roux. You need to stand over your roux and stir constantly until you are ready to throw in your vegetables. Watch out, though, because roux is HOT HOT HOT. And not only is it hot, but it sticks to your skin and gives you a nasty burn. They don't call it "Cajun Napalm" for nothing.


So what we do is constantly stir this stuff until it turns the color of a Hershey bar. We don't want it to turn black, because then it's burnt. Then, we throw in the vegetables, which stops the cooking immediately (which is necessary). In other words, we bring this thing right to the edge of the point of no return, and then we stop the cooking by throwing in the vegetables.


Stir, stir, stir...


Keep stirring....
                         

 Starting to change colors now...


Now that's starting to look good...


Almost there...


And BAM! Throw in that Cajun Trinity. This moment is perhaps my favorite moment in all of cooking. It's about the best smell you've ever smelled, and the intense sizzle of the vegetables is music to my ears.


While that's cooking, let's prepare the sausage. I usually use a link or two of smoked sausage and a link or two of andouille (a type of Cajun sausage). Don't worry too much if you cannot find andouille; it's a nice addition, but I realize it's not available everywhere (but definitely use it if you can get it).

For this, I used two links of andouille and one link of smoked deer sausage.


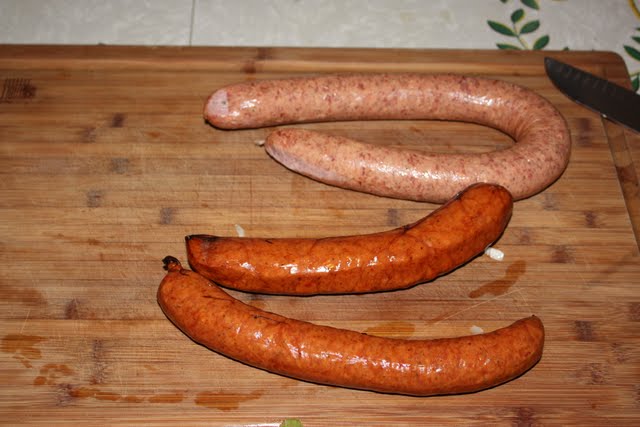
Chop it up. I like them to be about half an inch thick.


Now, your vegetables should be almost done cooking in the roux. You want them to be close to translucent.


Now, remember that stock we made? Heat it up. We are going to add the hot roux/veggies to the stock, and if there is a big temperature difference between the two, the roux will separate, which is a big pain.

So, once your stock is hot, use a big spoon to scoop in the roux/veggies mixture.


Next, add the sausage, and cook this in low for a while. A couple of hours should be good.


Mmmm, looking great.


Getting hungry? This will make your whole house smell wonderful.


Once this has been going for a while, it's time to make your rice. Making rice is really easy, yet people seem to find ever new and creative ways to screw it up. All you need to know is this: 1 part rice/1.5 part water. Bring to boil, then simmer for 15 minutes.

I also like to add a few bay leaves and a little butter.


When it's done, it should look just like this.


Next, I threw in all my leftover turkey meat. I didn't want the meat in the gumbo the whole time, since it was already cooked and would dry out. Just let that cook down for a few minutes.


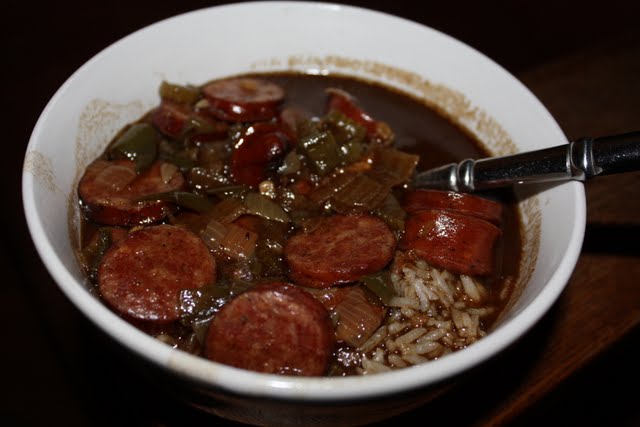
 Now your gumbo is ready. Just take a look at that. Oh my.


To serve: put some rice in a bowl and ladle your gumbo over it. This gumbo was so good I did not add a single spice or drop of hot sauce to it. The flavor was simply outstanding.

If you have some, I really recommend chopping putting some diced green onions on top; it really adds a nice *something* to your dish, but I did not have any this time.

Finally, enjoy!


Wednesday, November 23, 2011

Pork Belly


While pork belly has become quite the fad recently, many people are turned off by it. Admittedly, it doesn't have the most appetizing name in the world. What surprises a lot of people, though, is how much pork belly they already eat without realizing it: bacon. Yep, bacon is simply cured pork belly, and the reason bacon is delicious is the same reason pork belly is delicious: high fat content.

If you can find a place that supplies pork belly in your area, consider yourself fortunate (I get mine from the Korean grocery store in town). Pork belly is wonderfully rich and flavorful, and you owe it to yourself to add it to your rotation.


For this dish, we had a guest chef. Yes, unfortunately I cannot take credit for any of this. My wonderful girlfriend and jewelry blogger took over for this meal, and from what I can tell, she is pretty proud. She should be.


First, your ingredients. This cut of meat is so good on it's own that I really don't like to add too much to it. I simply score it, season it with *ahem* salt, pepper, and thyme and roast/braise it over some onions, garlics, and beef stock + wine.


So when you get a slab of pork belly, it's going to look something like this. The top part is skin, and underneath that skin is delicious pork meat and fat.


First, take a sharp knife and score the skin. Try to cut through all the skin but avoid cutting into the actual meat. This will help your skin get really nice and crispy (one of the best parts of pork belly).


I like to score it diagonally from two different directions, resulting in a criss-cross diamond like pattern. Season your pork belly with salt, pepper, and maybe a little thyme.


Next, chop up some vegetables and throw them at the bottom of a pan. For this, we just used some onions we had lying around, some carrots, and threw a whole bunch of garlic cloves in there.


Place the pork belly on top of the bed of vegetables.


Turn your oven all the way up and put it in. Our goal here is to cook it on high heat so that the skin on top bubbles up and gets nice and crispy.


Now, due to "camera difficulties" (read: my inability to remember to put the memory card in the camera), I do not have any pictures of what it is supposed to look like once the skin is cooked. Just know that it should take about 30 minutes, give or take a bit, and your skin should be bubbling and crisping.

Next, I like to pour in some beef stock and some wine (red, white, or both...who cares), and turn the temperature of the oven way down (200 or 250). We want to slow cook this thing in the stock+wine.


When it's done, you should have something that looks like this


DELICIOUS!


I hope you enjoy the pork belly. There are surprisingly few recipes out there on the internet about cooking pork belly, so hopefully this can help some people trying to cook this dish.


One thing of note: next time I cook pork belly, instead of putting the thing into a super hot oven, I think instead I'm going to put it on a rack close to the broiler and just broil it really hot in order to get that skin crisping up real good. THEN I'm going to slowly braise it in the stock+wine just like this time.

Thursday, November 17, 2011

Butterflied Roast Chicken


This will not be my last post on roast chicken. Much like my red sauce, while I can make a good one, I have not perfected it. While it's simple and easy to make a passible roast chicken, it is very difficult to make a perfect roast chicken every time. A perfect roast chicken is when the skin is crispy throughout, the meat is not dry, and it is seasoned perfectly. Doesn't sound hard, right?


One of the reasons that chicken is difficult is that by the time it is cooked throughout, the breast is already getting dry. Quite simply, while it may take 45 minutes for the thigh meat to cook, the breast meat was done 20 minutes ago and has been cooking at a decent heat for way too long. One way to get around this is to butterfly the chicken.


While I'd like to blame my inconsistencies on the rather sub-par oven I use (I swear it is never the actual temperature it says), I'm afraid that roast chicken is something I'll have to continue to improve upon.

That said, while it might not be perfect every time, my roast chicken is pretty darn good every time. One of the great things about roast chicken is its versatility. While my favorite is seasoned with perhaps the most tastiest, most versatile seasoning combination around (*ahem* salt, peper, and a little thyme), you can really mix this stuff up if you want. Lemons, fennel, garlic, carrots, etc... can all be stuffed in the cavity, and you can spread whatever you want on the skin. Cilantro, mint, ginger, oregano, beer,....whatever. Chickens are only a few bucks: experiment!

First, you want a medium-sized chicken. I try to find natural ones, not the normal, Pamela Anderson huge-breasted Frankenchickens you typically get at the store. The Korean market here in town has some good, fresh ones for cheap.

The first thing I do is uncover the chicken, wash/dry it, and let it sit in the refrigerator for a few hours. The goal here is to get as dry a skin as possible, which will in turn help you get that crispy skin. Putting it in the refrigerator helps because it is so dry in there that it will help dry off your chicken.

However, take it out a few hours before you cook it. You want it to come to room temperature.


Letting it come to room temperature is important. If you put a cold bird in the oven, you're already starting behind the 8-ball. While it comes to temperature, I also like to season it and let that salt/seasoning really get in there.


For this chicken, I used a combination of paprika, cayenne, garlic powder, onion powder, oregano, thyme, black pepper, and kosher salt. Lots and lots of kosher salt. It is really hard to over-salt your chicken skin.... I use over two tablespoons, and that isn't too much at all. Some would say it's not enough.

Also, make sure not to wash your hands yet. Instead, get the seasoning all over your fingers....


On the neck side of the chicken, if you dig a little, you can actually get your fingers all up in between the chicken breast and the skin. It's like high school dates all over again.


Repeat the same process on the other side. Make sure to really dig around in there. If you do it right, you can even reach the thighs and wings. 


Let that sit for a couple of hours so that the bird is room temperature (or close to it). Next, grab a pair of kitchen scissors and cut along the backbone on both sides


The result of this will allow you to press the chicken down and open it up like a book. You really want to get it as flat as possible. I save the backbone. It adds flavor, you can gnaw on it after or use it to make stock, gravies, sauces, etc...


Next, we make sure our chicken skin is crispy. We are going to fry the entire bird breast side down in hot oil for a few minutes before flipping it over and baking it. So, heat up some oil (any kind put olive; that stuff is gross when heated up) in a cast iron skillet. When it's really hot, put the chicken in the oil.


You should hear it sizzling and popping. This is good. After a few minutes, you should be able to flip the bird over without it sticking to the pan. Once you can do this, the skin has cooked enough. 


Put it in the oven at ~350 degrees. It should only take about 20 minutes. You have already fried the skin and cooked a good part of the breast, you just need the rest to get up to temperature. As ls long as the thighs easily separate from the body or a thermometer reads 160 degrees in the thickest part of the chicken, you should be good.

It will look like this when it comes out.


Next, you actually want to wait a bit before cutting up the chicken. It's so hot right now that if you cut it, the juices are going to come pouring out of any incision. Therefore, wrap it up in some aluminum foil for about 5 - 10 minutes. This will allow the juices to "lock in," making for a jucier chicken. Be sure to let the steam escape, though... we don't want to ruin that cripsy skin by getting it all soggy.


Finally, I carve the chicken up into serving portions. Here, I have 2 breasts, two thighs/legs, and 2 wings.


And perhaps one of the best parts about roasting chickens is the chicken drippings. All that fat/oil/seasoning is just sitting at the bottom of your pan just begging to help you make something good. You can add a little flour and water and cook down to make a gravy, you can add some wine and reduce it to make a sauce, or you can just sautee stuff straight in it. For this meal, I only had mushrooms, but it was delicious.


I typically cook something with the drippings as I am letting my chicken rest for a bit.


So there you go. I hope you guys try it and like it as much as I do!